
Pour-Over Coffee Guide: Brew a Better Cup at Home
Here’s the fast version: use 20 grams of coffee to 320 grams of water (a 1:16 ratio), heat that water to about 93°C (200°F), grind to a texture like coarse table salt, and aim for a total brew time of 2:30 to 3:30 from first pour to drawdown. That’s it. Everything else in this pour over coffee guide is refinement.
Lock in these numbers before you touch a kettle:
- Ratio: about 1:16 as a reliable starting point
- Temperature: around 93°C
- Grind: medium, similar to table salt
- Total time: 2:30–3:30 for a single-cup cone dripper
Pro Tip: The SCA-referenced brewing window sits at roughly 90–96°C, with 93°C as the practical sweet spot most home brewers should default to.
Key Takeaways
Consistent pour-over coffee comes down to a fixed ratio, controlled temperature, the right grind, and a repeatable pour, not expensive gear.
| Point | Details |
|---|---|
| Start with 1:16 | Use 20 g coffee to 320 g water at 93°C for a reliable single-cup baseline. |
| Grind size drives time | If drawdown finishes outside 2:30–3:30, adjust grind before anything else. |
| Bloom before pouring | Wet grounds with 2 to 3 times their weight in water and rest 30 to 45 seconds. |
| Change one variable at a time | Isolating grind, temperature, or ratio changes makes troubleshooting reliable. |
| Freshness matters most | Eastviewcoffee’s small-batch, women-sourced beans give this recipe a strong starting point. |
Table of Contents
- Essential Equipment for Pour-Over Coffee
- Which Beans and Grind Size Work Best for Pour-Over?
- How Do You Brew Pour-Over Coffee Step by Step?
- Why Is My Pour-Over Sour, Bitter, or Weak?
- How Do You Clean and Maintain Pour-Over Gear?
- Why Fresh, Small-Batch Roasted Coffee Changes Your Results
- Try a Fresh Bag or Get a Personalized Match
- Sources
- FAQ
Essential Equipment for Pour-Over Coffee
You need six things: a dripper, filters, a kettle, a burr grinder, a scale, and something to catch the coffee. Skip any one of them and you’re guessing instead of brewing.
- Dripper: cone-shaped (V60-style), flat-bottom (Kalita-style), or carafe-style (Chemex-style)
- Filters: paper filters matched to your dripper’s shape
- Kettle: a gooseneck kettle for a controllable pour
- Grinder: a burr grinder, not a blade grinder
- Scale: a digital scale accurate to 0.1 g if possible
- Server or mug: whatever you’re brewing into
The dripper shape changes more than looks. Cone drippers with a single large hole drain fast and reward precise technique, which makes them responsive but less forgiving of a sloppy pour. Flat-bottom drippers sit in the middle, holding water a bit longer for a more even extraction with less fuss. Carafe-style drippers use thicker filters that slow the flow dramatically, producing a lighter, cleaner cup that tolerates beginner mistakes better than a cone does.
A gooseneck kettle and a decent burr grinder do more for your cup than an expensive dripper ever will, since thin, controlled pours and consistent grind particles are what actually drive extraction.
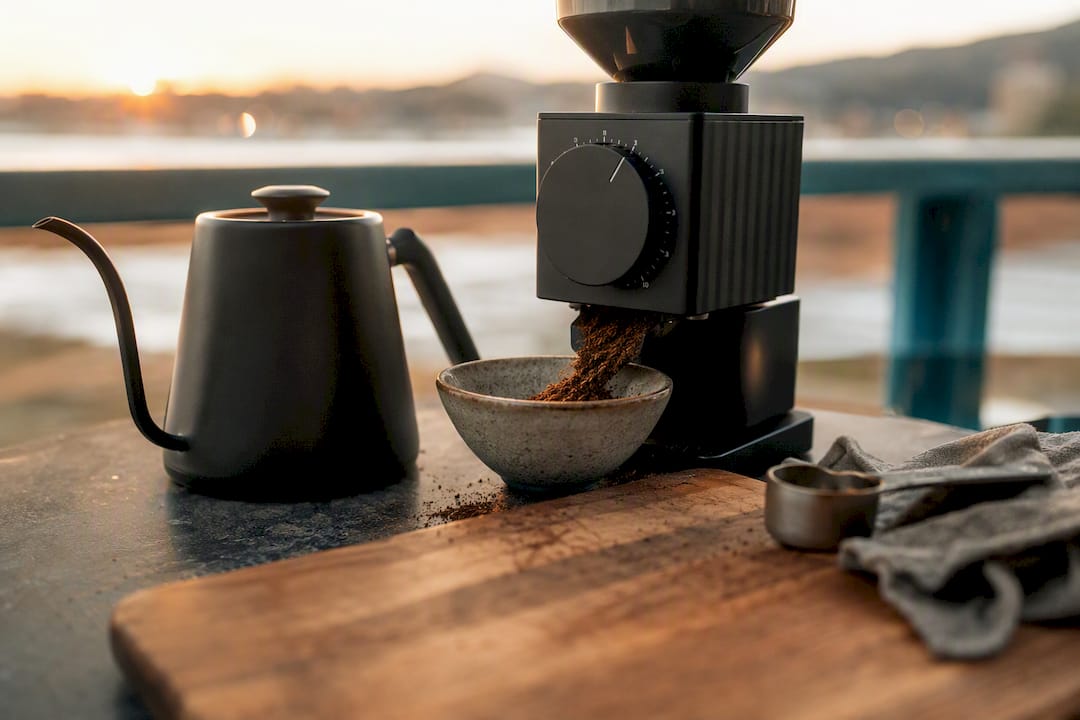
Pro Tip: If you’re building your setup piece by piece, spend in this order: beans first, grinder second, kettle third, dripper fourth, scale last. A great grinder with cheap beans beats a fancy dripper with stale ones every time.
You can shop kettles, scales, and drippers together on Eastviewcoffee’s coffee equipment page once you know what you’re missing.
Which Beans and Grind Size Work Best for Pour-Over?
Lighter to medium roasts tend to shine in pour-over because their acidity and origin character come through clearly at moderate brewing temperatures. Darker roasts can work too, but they often benefit from lower water temperatures to avoid a scorched taste, since the extra roast development already pulls out more soluble compounds.
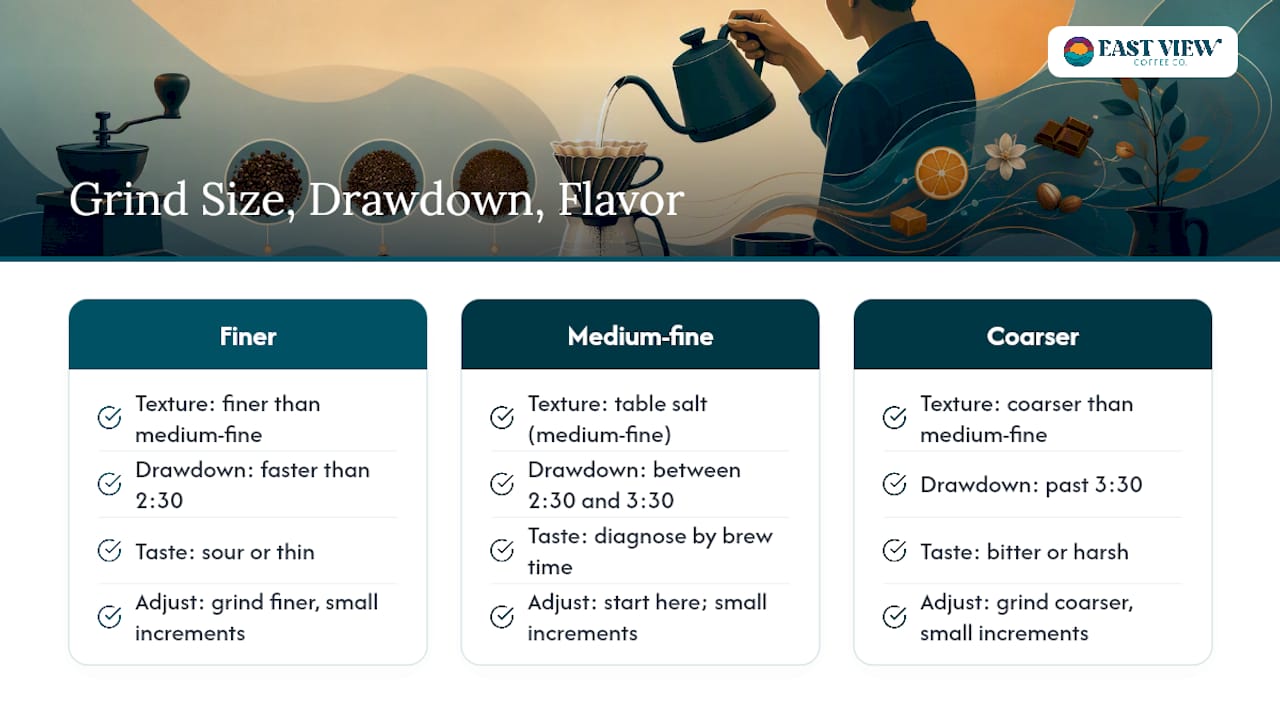
Start your grind size for pour-over at medium-fine, roughly the texture of table salt, finer than you’d use for a French press and coarser than espresso. From there, let your total brew time do the diagnosing: if your coffee drains faster than 2:30 and tastes sour or thin, grind finer. If it drags past 3:30 and turns bitter or harsh, grind coarser. Make small adjustments, one or two clicks at a time on most grinders, then brew again before judging the result.
Buy whole bean and grind right before brewing. Coffee loses aroma fast once ground, and beans peak in flavor roughly one to three weeks past the roast date, not months. Eastviewcoffee’s brewing guide covers grinder settings in more depth if you want to fine-tune beyond the basics.
Pro Tip: Change your grinder in tiny increments and taste before adjusting again. Jumping too far in one direction is the most common reason home brewers can’t seem to land on a setting they like.
How Do You Brew Pour-Over Coffee Step by Step?
Set your scale to grams, heat your water to 93°C, and pick one of these two recipes before you start:
- Single mug: 20 g coffee, 320 g water (1:16), for one large cup
- Small carafe: 30 g coffee, 480 g water (1:16), for two servings
Now follow the sequence:
- Heat your water to 93°C. If you don’t have a temperature-controlled kettle, boil it and let it sit for about a minute.
- Rinse the filter with hot water directly in the dripper, then discard that water. This step clears papery taste and helps the filter seat properly against the dripper walls.
- Add your ground coffee to the filter and give the dripper a gentle shake to level the bed.
- Bloom the grounds. Pour about 2 to 3 times the coffee weight in water, roughly 40 to 60 g for a 20 g dose, and let it sit for 30 to 45 seconds. This releases trapped CO2 so the rest of your pours extract evenly instead of pushing water around trapped gas.
- Pour in stages. Add water in two or three controlled pours, pausing between each so the bed drains partway before you add more. Keep the stream pencil-thin, aimed at the center of the bed, and spiral outward without ever touching the filter walls.
- Watch the drawdown. The water level should drop steadily, not gush or stall. Total time from your first pour to the last drop should land between 2:30 and 3:30 for the single-cup recipe.
- Pull the dripper and serve. Once the bed has fully drained, remove the dripper and give your cup a stir before drinking.
For technique, you’ll choose between pulse pouring (several small additions with pauses) or a continuous pour (one steady stream from bloom to finish). Pulse pouring gives you more control and is easier for beginners to keep consistent. Continuous pouring is faster and works well once your hand has learned a steady rhythm.
Pro Tip: Practice your pour rate with plain water and a scale before you brew real coffee. Aim for a slow, even stream, roughly 3 to 5 grams per second, and repeat the same motion every time rather than improvising a new pattern each brew.
Why Is My Pour-Over Sour, Bitter, or Weak?
Drawdown time is your best diagnostic tool. If your brew finishes well outside the 2:30–3:30 window for a single cup, something upstream needs adjusting, and grind size is almost always the first lever to pull before you touch temperature or ratio.
| Symptom | Likely cause | First fix |
|---|---|---|
| Sour, sharp taste | Under-extraction, drawdown too fast | Grind finer |
| Bitter, harsh taste | Over-extraction, drawdown too slow | Grind coarser |
| Weak, watery body | Ratio too dilute or pour too fast | Use less water or slow your pour |
| Uneven flavor, muddy cup | Channeling from pouring on filter walls | Center pours, avoid the walls |
| Fast drawdown despite fine grind | Coffee bed disturbed or uneven | Level the bed before brewing |
A flat, even coffee bed after brewing usually means your extraction was even too. A muddy, cratered, or lopsided bed almost always points to uneven pouring or a grind size that’s fighting your pour rate.
- Pour in a slow spiral, never directly onto the paper
- Level your coffee bed with a gentle shake before the bloom
- If channeling persists, try a slightly coarser grind to slow the flow near the walls
Pro Tip: Change one variable per brew. If you adjust grind, temperature, and pour speed all at once, you’ll never know which change actually fixed the cup.
How Do You Clean and Maintain Pour-Over Gear?
Rinse your dripper, server, and kettle with hot water after every brew, and wash filters straight into the compost or trash. Coffee oils, known as caffeol, build up fast and turn stale, so give your dripper a soap scrub weekly to keep future cups from tasting rancid.
- Rinse gear daily, deep clean weekly with mild soap
- Wipe your grinder’s burrs monthly to clear stuck grounds
- Replace paper filters every brew, never reuse them
Pro Tip: Descale your kettle every few months if you have hard water, since mineral buildup changes how evenly it heats.
Why Fresh, Small-Batch Roasted Coffee Changes Your Results
Every recipe in this guide assumes fresh beans, and that’s not a small caveat. Stale coffee, even ground to the perfect setting, extracts unevenly and tastes flat no matter how carefully you pour. Eastviewcoffee roasts in small batches in Kenosha, Wisconsin, sourcing from women-owned farms, which means the bags on the shelf were roasted recently rather than sitting in a warehouse for months.
For the single-cup recipe above, Community Freshly Roasted Coffee is a solid place to start. It’s approachable enough for a first pour-over attempt and gives you a clean baseline to compare future beans against.
- Try a single-origin bag to taste distinct origin character
- Try a blend for a more rounded, forgiving cup
- Notice how a lighter roast brightens acidity versus a darker roast’s heavier body
Pro Tip: If you’re unsure which roast fits your taste, use Eastviewcoffee’s custom coffee recommendation tool to narrow it down before you buy.
A Note on Learning Pour-Over
Fancy gear won’t fix a shaky pour. What actually moves your coffee from “fine” to consistently good is repeating one recipe until your hand knows the motion without thinking about it. Grind consistency and a repeatable pour technique account for most of the improvement you’ll see in your first few weeks. Everything past that is fine-tuning.
Try a Fresh Bag or Get a Personalized Match
Most guides stop at technique and leave you guessing which beans to actually buy. Eastviewcoffee skips that gap: every bag is roasted in small batches in Kenosha, Wisconsin, from women-owned farms, so you’re not brewing a recipe on top of stale, months-old coffee. If you want to test the single-cup recipe above tonight, grab a bag of Community Freshly Roasted Coffee and follow the steps exactly as written.
Not sure which roast fits your taste yet? Use the custom coffee recommendation tool to get matched to a bag before you order, or browse seasonal single-origin coffees if you already know you want to experiment with origin character. Either way, start with fresh beans and the recipe above, then adjust from there.
Sources
- How to Make Pour Over Coffee: The Complete Guide (2026)
- The Pour Over Coffee Guide | Pulled Coffee
- How to Make Pour Over Coffee: Recipe & Guide | InstaCuppa
FAQ
What Grind Size Should I Use for Pour-Over?
Use a medium-fine grind, similar in texture to table salt. Adjust finer if your brew drains too fast and tastes sour, or coarser if it drags and tastes bitter.
How Long Should Pour-Over Coffee Take to Brew?
A single-cup cone dripper should take 2:30 to 3:30 total from your first pour to the last drop draining through.
What Water Temperature Is Best for Pour-Over Coffee?
Aim for about 93°C (200°F), which falls within the SCA-referenced range of roughly 90 to 96°C.
Why Does My Pour-Over Taste Weak or Watery?
Your ratio is likely too dilute, or you’re pouring too fast and rushing past the coffee bed. Try a tighter ratio like 1:16 and slow your pour rate.
Which Coffee Beans Work Best for Pour-Over?
Light to medium roasts, especially single-origin coffees, tend to highlight clarity and acidity in pour-over. Eastviewcoffee’s Community Freshly Roasted Coffee is a good starting bag for testing the recipes in this guide.