
Dial In Espresso in 3 Shots: Roaster Tips and 18g Start for Beginners
The fastest way to a balanced shot is a fixed recipe: a standard starting ratio of coffee in and espresso out, pulled in an appropriate time range. Once that ratio is locked, adjust grind first, since it controls flow more than any other variable. You’ll need a 0.1g scale, a burr grinder, and a tamper. Everything else in dialing in espresso is refinement.
TL;DR:
- Focusing on grind adjustments is essential since particle size primarily controls flow rate and extraction time.
- Always lock the dose to match your basket capacity to prevent puck compression issues that can affect shot quality.
- Use taste feedback alongside timing and weight measurements to make precise adjustments for sourness, bitterness, and channeling.
- Purge grounds after changing grind settings to avoid old particles influencing your next shot’s consistency.
- Regularly calibrate your grinder and check machine temperature and pressure to account for daily environmental and equipment variability.
Table of Contents
- How To Dial In Espresso: Tools and Baseline Setup You Need First
- What Are the Four Levers That Control Every Espresso Shot?
- Step-by-Step Dial-In Protocol: The 3-Shot Method
- Puck Preparation: Distribution and Tamping That Prevent Channeling
- Taste Diagnosis: Matching Flavor Problems to the Right Fix
- Why Do Espresso Settings Change Day to Day?
- Grind Size Calibration Techniques and Equipment
- Common Equipment Calibration Errors and Troubleshooting
- Why Espresso Machine Pressure and Pressure Profiling Matter
- How Water Temperature Affects Espresso Extraction
- The Role of Tamping Technique and Pressure
- Practical Notes on Speeding Up Dial-In
- Reliable Bags to Practice Your Dial-In On
- Sources
- FAQ
How To Dial In Espresso: Tools and Baseline Setup You Need First
Before you touch a single dial, get your equipment right. A blade grinder ruins your chances here. It shreds beans into uneven chunks and dust, which means water rushes through some particles and crawls through others, producing a shot that’s simultaneously sour and bitter. A burr grinder crushes beans between two abrasive surfaces to a consistent size, which is the entire foundation of predictable extraction.
Your minimum kit for how to dial in espresso at home looks like this:
- A gram scale accurate to 0.1g, for both dosing and timing your shot by weight, not by eye
- A burr grinder, stepped or stepless, with enough range to reach fine espresso settings
- A tamper that fits your portafilter basket snugly, with no gaps around the edges
- A timer, built into most scales now, to log extraction time
- A basket that matches your dose. An 18g basket is the current standard for most home machines
A pocket scale suitable for reproducible results, according to The Coffee Locator’s dial-in guide. You don’t need a $200 model to get consistent numbers.
The baseline recipe, 18g in and 36g out in 25 to 32 seconds, comes from a standard 1:2 ratio that Home Espresso Lab treats as the default starting point for most espresso roasts. Lock the dose and yield at these numbers while you dial in. Changing three variables at once tells you nothing. Changing one at a time tells you everything.
Match your dose to your basket’s capacity to avoid overly tight or shallow puck compression that affects flow. Check your basket’s markings or manufacturer spec before you start.
What Are the Four Levers That Control Every Espresso Shot?
Every espresso shot is the output of four adjustable inputs: grind, dose, yield, and time. Understanding what each one actually does is the difference between guessing and dialing in with intent.
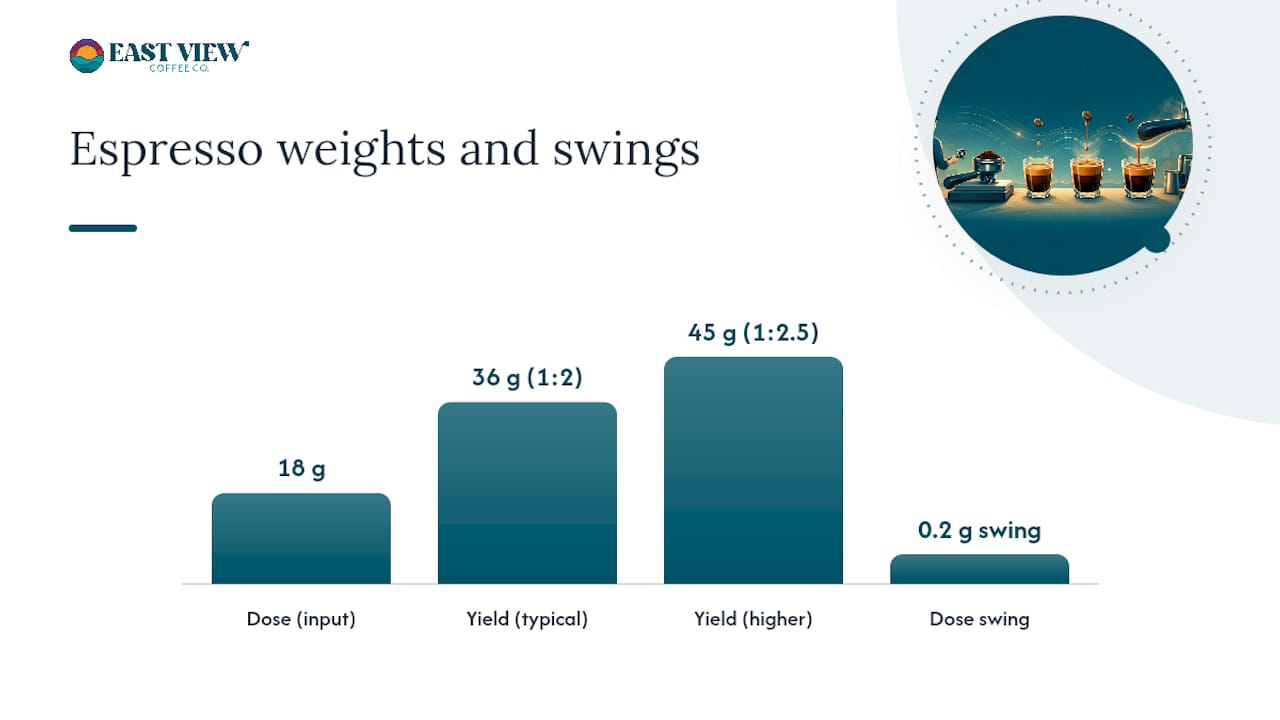
Grind is your primary lever. Finer grounds pack more tightly, slowing water flow and increasing extraction. Coarser grounds let water rush through faster, pulling less flavor from the coffee. On a stepped grinder, one click typically shifts particle size by a small but noticeable amount, a small but noticeable jump. Stepless grinders let you make finer adjustments between those same points, which is useful once you’re close to your target and need a smaller nudge than a full click allows.
Dose is how much dry coffee you put in the basket. More coffee means a deeper puck and a longer path for water to travel, which raises resistance and slows the shot. Consistency matters more than people expect here. A swing of even 0.2g between shots can shift your extraction time by a couple of seconds, enough to throw off your read on what the grind is actually doing.
Yield is your output weight, and it directly maps to strength. A 1:2 ratio (18g in, 36g out) produces a different intensity than a 1:2.5 ratio (18g in, 45g out), even with identical grind and dose. This is why you stop a shot by weight on the scale, not by watching the clock. Time is a symptom. Weight is the actual target.
Time is a diagnostic, not a goal. It tells you whether your grind is in the right window for your dose and yield. Most home baristas assume a shot “tastes right” the moment it hits a target time, but taste is the real judge. Once your time falls in range, small yield adjustments are what actually tune sweetness and balance, according to CoffeeTweaks’ barista guide.
Pro Tip: Write your changes down as you go. A shot that runs 34 seconds and tastes bitter tells you something different than a shot that runs 34 seconds and tastes sour. The number alone means nothing without the taste attached to it.
Typical micro-adjustments and their effects:
- One grind click finer: extraction time typically increases by a few seconds
- Dose change of 0.5 to 1g: shifts resistance and usually moves time by a few seconds in the same direction
- Yield change of 2 to 4g: adjusts strength and sweetness without touching grind at all
Step-by-Step Dial-In Protocol: The 3-Shot Method
This is the process that gets a new bag from “unknown” to “dialed in” in three or four pulls. Home Espresso Lab notes that most beans reach a workable dial-in by the third shot, with a fourth reserved purely for confirmation.
-
Prep and purge. Clean any old grounds from the grinder chute. If you’re changing a setting from a previous bag, purge a small amount of grounds through the grinder first so stale particles don’t skew your dose, a step Home Espresso Lab calls out specifically for grinder adjustments. Set your grinder to the manufacturer’s suggested espresso range or your last known setting for a similar roast level.
-
Pull shot one at your baseline. Dose 18g, target 36g out, and time the shot from the moment water hits the puck. Watch the stream. It should start dark and slow down within a few seconds, not gush immediately or drip in a thin, delayed trickle. Taste it. Note whether it’s sharp and sour, flat and bitter, or reasonably balanced with some acidity and sweetness.
-
Adjust grind based on your time reading. If the shot ran under 20 seconds, it’s flowing too fast. Go finer by one or two clicks. If it ran past 35 seconds, go coarser. Purge the grinder again after any setting change, then pull shot two at the same 18g dose and 36g target.
-
Fine-tune with a smaller move. If shot two lands in the 25 to 32 second window but tastes slightly sour, increase yield by 2 to 4g rather than changing grind again, per Espresso Atlas’s fast dial-in method. If it tastes bitter or harsh, decrease yield by that same 2 to 4g. Pull shot three with this adjustment.
-
Confirm with an optional fourth shot. If shot three tastes right and the time still sits in your target window, pull one more to confirm repeatability. This is also where small temperature tweaks of half a degree to a full degree Celsius, or a slight dose change, can rescue a stubborn cup that grind and yield alone haven’t fixed.
The one rule that makes this whole process work: change only one variable between shots. Two changes at once and you’ve lost the thread on what actually fixed or broke the shot. Keep a small notebook or notes app entry with grind setting, dose, yield, and time for every pull. It sounds tedious for four shots. It stops being tedious the moment you open a new bag next month and already know where to start.
Puck Preparation: Distribution and Tamping That Prevent Channeling
A perfectly dialed grind setting still produces a bad shot if the puck itself is uneven. Water always finds the path of least resistance, and a lumpy or unevenly tamped puck hands it plenty of shortcuts.
The sequence that works, every time, in this order:
- Purge the portafilter basket of any leftover grounds or oils
- Distribute the dose evenly, using a WDT tool (a set of fine needles stirred through the grounds) or a few firm taps and swirls to break up clumps
- Level the surface with a light pass of your finger or a distribution tool
- Tamp straight down with consistent, repeated pressure and motion
- Wipe any loose grounds from the basket rim before locking into the group head
You don’t need a bathroom scale to measure your tamp force in pounds. What matters far more is repeating the exact same motion every single time, so tamping stops being a variable you have to think about. Espresso Atlas points out that channeling gets blamed on grind far more often than it deserves. Most mixed or erratic shots trace back to distribution, not particle size.
Pro Tip: After the shot finishes, pop the portafilter off and look at the spent puck before you knock it out. It tells you more than the shot glass does.
Use this quick read on what you see:
| Puck appearance | What it means |
|---|---|
| Intact, holds its shape, slightly damp | Well extracted, good distribution |
| Wet, soupy, falls apart easily | Underdosed or dose too low for the basket |
| Cracked or hollowed in the center | Channeling, usually from poor distribution |
| Dry and stuck hard to the screen | Overdosed or tamped unevenly |
This puck-read checklist comes from The Coffee Locator’s guide and takes about two seconds to check once it’s habit.
Taste Diagnosis: Matching Flavor Problems to the Right Fix
Every off-tasting shot points to a specific, fixable cause. The trick is reading the symptom correctly instead of randomly twisting the grind dial and hoping.
Sour, sharp, or thin, with a fast shot time. This is classic under-extraction. Water moved through the puck too quickly to pull enough flavor compounds out of the grounds. Tighten the grind first. If your time was already in the 25 to 32 second range but the shot still tastes sour, leave grind alone and increase yield by 2 to 4g instead, letting a bit more water extract additional sweetness.
Bitter, harsh, or dry, with a slow shot time. This is over-extraction. Too much surface area or too long a contact time pulled out compounds that taste unpleasant, often described as ashy or astringent. Coarsen the grind. If time already sits in range but bitterness persists, reduce yield by 2 to 4g rather than touching the grind setting.
Sour and bitter at the same time, or a spotty, inconsistent flavor. This combination almost never means your grind is wrong. It means part of the puck extracted properly while another part extracted too much or too little, which is the signature of channeling. Fix your distribution and tamp consistency, then re-pull at the exact same grind setting before you touch anything else.
Here’s how the three main levers stack up when you’re deciding what to move:
| Symptom | Adjustment | Typical increment |
|---|---|---|
| Sour, fast, grind clearly off | Grind finer | 1 click or small dial turn |
| Sour, time already correct | Increase yield | 2–4g |
| Bitter, slow, grind clearly off | Grind coarser | 1 click or small dial turn |
| Bitter, time already correct | Decrease yield | 2–4g |
| Stubborn flavor with grind/yield correct | Adjust temperature | 0.5–1°C |
Espresso Atlas recommends keeping yield moves in that 2 to 4 gram range specifically because bigger jumps overshoot and make it hard to tell what actually fixed the shot. Temperature changes belong last on this list. The Coffee Locator frames a half degree to a full degree Celsius as a subtle rescue tool for a cup that’s otherwise correct on grind and yield but still tastes stubbornly off. Reach for it only after the bigger levers are already settled.
Why Do Espresso Settings Change Day to Day?
Coffee is hygroscopic, meaning it absorbs moisture from the air, and that single fact explains most of the “my grinder setting stopped working” frustration home baristas run into. A humid morning swells the grounds slightly and can slow your shot down even with zero changes to your setup. A dry day does the opposite. Bean age matters too. Coffee degasses steadily after roasting, and beans two weeks old behave differently at the same grind setting than the same beans at day three.
Professional baristas deal with this by pulling a quick calibration shot at the start of every shift rather than assuming yesterday’s setting still holds. Adopt the same habit at home. It costs you one shot and a few minutes.
A short daily routine keeps drift from turning into a mystery:
- Pull one calibration shot each morning before committing to your real cup, especially with a new or opened bag
- Purge a small amount of grounds any time you change the grind setting, so leftover particles from the old setting don’t sneak into your next dose
- Clean the grinder burrs and chute weekly. Old coffee oils build up and cake onto the burrs, which throws off particle consistency even at a fixed setting
- Replace burrs once you notice retention creeping up or shots becoming inconsistent at settings that used to be reliable
- Check your machine’s brew temperature periodically, and if it drifts wildly or shots taste consistently off despite correct grind and dose, that’s a signal to have a technician look at the thermostat or boiler
Grind Size Calibration Techniques and Equipment
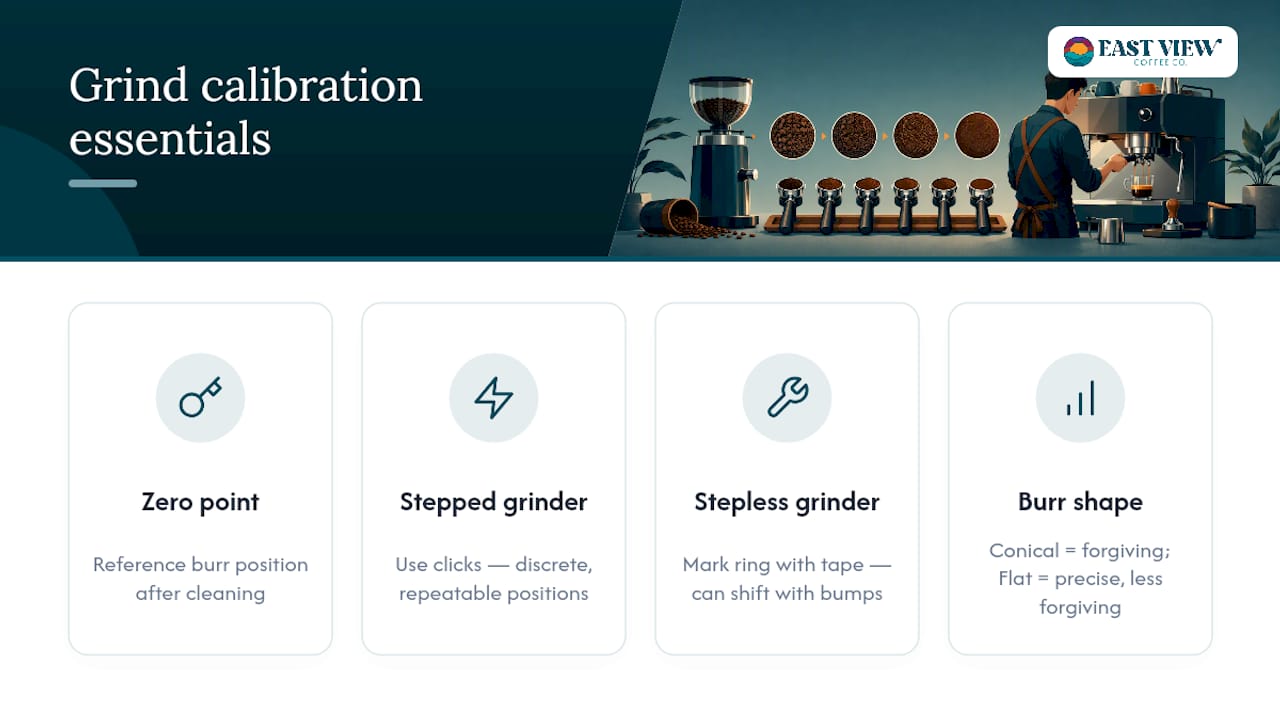
Calibrating a grinder isn’t a one-time setup. It’s an ongoing relationship between your specific machine, your specific beans, and the weather that day. Start by finding your grinder’s “zero point,” the setting where the burrs just barely touch with no coffee between them. Most manufacturers document this, and knowing it gives you a fixed reference point to return to after cleaning or burr replacement.
From there, count clicks or track dial position relative to that zero point rather than relying on memory. Stepped grinders make this easy since each click is a discrete, repeatable position. Stepless grinders require more attention since the adjustment ring can shift slightly with vibration or bumping, so mark your position with tape or a written reference if your model doesn’t have fine markings.
Burr shape and material also affect how forgiving your calibration is. Conical burrs tend to produce a slightly wider particle distribution and are somewhat more forgiving of small grind errors. Flat burrs produce a narrower, more uniform distribution, which rewards precision but punishes sloppy calibration harder. Neither is objectively better for home use, but knowing which one you have changes how sensitive your dial-in process needs to be.
A sieve or grind analysis tool can show particle distribution visually if you want to go deeper, but it’s genuinely optional for home use. The 3-shot dial-in protocol covered earlier gets you to a good result without one.
Common Equipment Calibration Errors and Troubleshooting
The single most common mistake is changing grind and dose in the same breath, then having no idea which adjustment actually fixed or broke the shot. Isolate variables. Always.
The second most common error is trusting time over taste and weight. A shot can hit 28 seconds and still taste wrong if your yield target was off or your puck channeled. Time is a diagnostic tool, not the finish line.
A third frequent problem is skipping the purge after a grind adjustment. Old grounds sitting in the chute from a previous, coarser or finer setting mix into your next dose, muddying your read on what the new setting actually does. Five to eight grams purged through the grinder clears this out reliably, per Home Espresso Lab.
Inconsistent tamping is another quiet culprit. If your tamp angle or pressure varies shot to shot, you’re effectively changing a variable without realizing it, and your grind adjustments will seem to behave erratically for no clear reason.
Finally, watch for a portafilter basket mismatched to your dose. Running 20g in an 18g basket, or the reverse, distorts puck depth and resistance in ways that no grind adjustment can fully correct. Match dose to basket capacity before troubleshooting anything else.
Why Espresso Machine Pressure and Pressure Profiling Matter
Standard espresso machines push water through the puck at roughly 9 bars of pressure, a figure that became the industry default because it reliably extracts a good balance of flavor without over-pressurizing delicate compounds. That pressure is what creates crema and drives the fast, forceful extraction that separates espresso from every other brewing method.
Pressure profiling, available on higher-end machines, lets you vary that pressure across the shot rather than holding a flat 9 bars throughout. A common profile ramps pressure up gradually at the start, called a pre-infusion phase, to gently saturate the puck before full pressure hits. This reduces the risk of channeling on uneven pucks and can pull a touch more sweetness from lighter roasts.
For most home setups without profiling features, consistent pressure delivery matters more than the ability to shape a curve. A worn gasket, a pump losing pressure, or a group head with buildup can all quietly drop your effective pressure below spec, and no amount of grind adjustment will compensate for a machine that isn’t delivering full pressure to begin with. If your shots have gotten noticeably slower over time at settings that used to work, and cleaning hasn’t helped, a pressure check is worth a technician visit before you chase the problem through grind and dose changes.
How Water Temperature Affects Espresso Extraction
Brew temperature typically sits within a moderate range on most home machines, and this range exists because it extracts desirable flavor compounds without pulling out the harsher, more bitter ones that higher heat releases too aggressively.
Hotter water extracts faster and pulls more soluble compounds in the same amount of time, which can push a shot toward bitterness if your grind and yield are already dialed for a lower temperature. Cooler water slows extraction and can leave a shot tasting sour or underdeveloped even at a grind setting that worked fine yesterday.
Treat temperature as a fine-tuning tool, not a first move. As covered earlier, a shift of half a degree to a full degree Celsius can rescue a shot that’s stubbornly sour or bitter despite correct grind and yield, but reach for grind and yield adjustments first since they have a larger, more predictable effect. Read more on how temperature interacts with different roast levels in Eastviewcoffee’s brewing guide.
If your machine has a PID controller, you can set and hold temperature precisely, which removes one more variable from your troubleshooting. Machines without one may drift a few degrees across a shot or between shots pulled back to back, which is worth knowing before you blame a grind change for a flavor shift that was actually a temperature swing.
The Role of Tamping Technique and Pressure
Tamping compresses the coffee bed evenly to prevent loose pockets, with consistency being more important than exact force A tamp of moderate, consistent pressure applied the same way every single time beats a harder tamp applied inconsistently.
Keep the tamper level. A tilted tamp compresses one side of the puck more than the other, and that imbalance is enough to create a channel the moment water hits it under pressure. Rest your wrist and forearm in a straight line with the tamper shaft, press straight down, and avoid twisting or grinding the tamper into the coffee bed, since twisting can polish the surface in a way that actually encourages uneven flow.
A light polish tamp, a second, gentle pass after the main tamp, can help smooth out any last unevenness, though it’s optional once your distribution technique is solid. What matters far more than any of these fine details is consistency shot after shot. If you tamp firmly one day and lightly the next, you’ve introduced a variable that will confuse every other adjustment you make, making it look like your grind setting stopped working when tamping pressure was the actual culprit.
Practical Notes on Speeding Up Dial-In
Every bag behaves a little differently, and that’s the part most dial-in guides skip. Roast level, bean origin, and even how many days off roast a bag is all shift where your grind setting needs to land. When a roaster provides a suggested starting recipe on the bag or product page, use it as your shot-one baseline instead of guessing blind. It typically saves you an entire shot’s worth of coffee and time.
Small-batch roasting keeps that consistency reliable from bag to bag, which matters more than people realize when you’re trying to isolate grind as your only variable. Check the brewing guide for roast-specific notes, and read more about how roast profile shapes extraction behavior on the espresso beans page.
Keep a recipe log for every bag: grind setting, dose, yield, time, and temperature if your machine allows it. It sounds like overkill for a morning cup. It stops feeling that way the first time a new bag arrives and you skip straight to shot two instead of starting from zero.
— Jenny
Reliable Bags to Practice Your Dial-In On
Dialing in works best when the bean itself isn’t a moving target, which is exactly why starting with a consistent, freshly roasted bag matters as much as your technique.
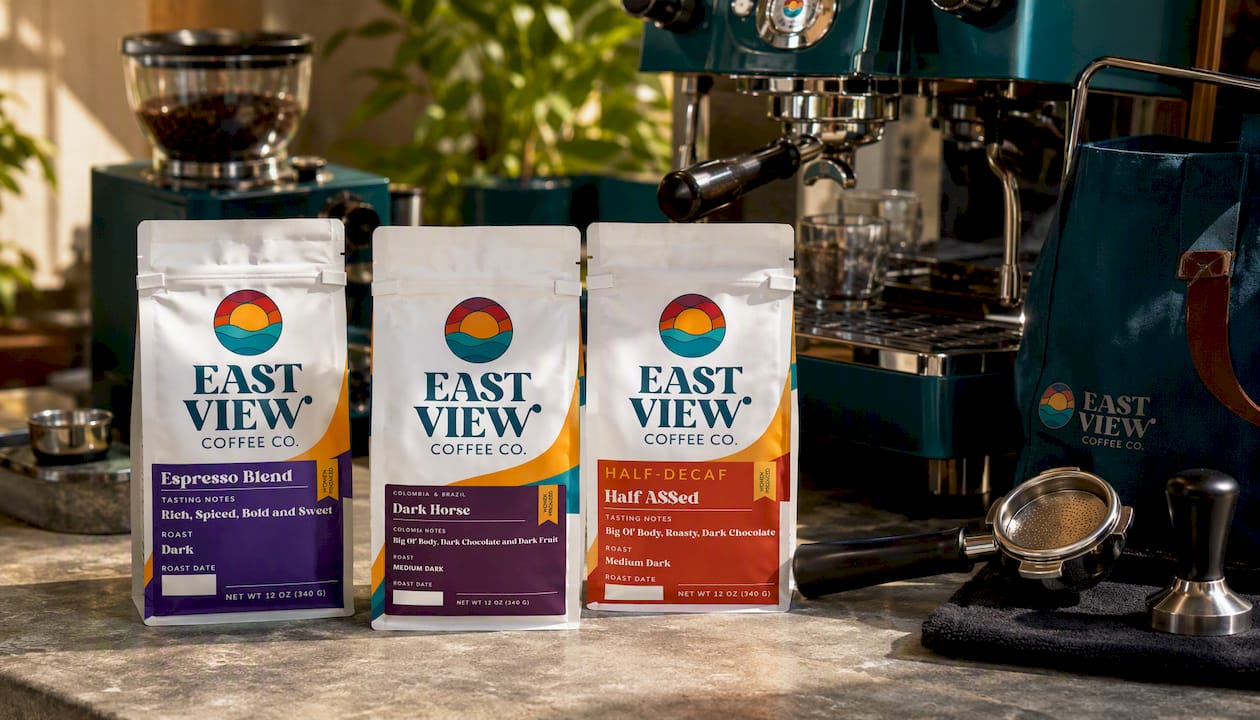
The Espresso Blend Freshly Roasted Coffee is built specifically for pulling shots, with a balanced profile that gives clear, readable feedback when you nudge grind or yield, which makes it a solid first bag for anyone working through the 3-shot method. If you prefer a bolder, darker cup, the Dark Horse Freshly Roasted Coffee holds up well to slightly finer grind settings and rewards a touch more yield for those who like intensity over acidity. For readers cutting back on caffeine without giving up the ritual, the Half-A$$ed Half-Caff Freshly Roasted Coffee dials in the same way as a full-caf bean, so your technique carries over completely.
Every bag is roasted in small batches in Kenosha, Wisconsin, sourced from women-owned farms, so what changes from bag to bag is roast character, not consistency. Pick one, follow the baseline recipe, and log your first four shots. Order a bag from the Espresso Blend page and start your dial-in tonight.
Sources
For a deeper technical walkthrough of the four-lever system and the full step-by-step protocol, Home Espresso Lab’s guide covers the mechanics in more depth than a single article can. CoffeeTweaks’ barista guide is worth reading for its focus on weight-based stopping over time-based habits. Espresso Atlas has a sharper breakdown of taste-to-fix mapping if you want more troubleshooting scenarios, and The Coffee Locator covers the puck-read checklist in more visual detail.
- How to Dial In Espresso: The Complete Step-by-Step Walkthrough | Home Espresso Lab
- How to Pull the Perfect Espresso Shot at Home: Barista Guide | CoffeeTweaks
- How to Dial In Espresso: Fast Home Method + Taste Fixes | Espresso Atlas
- How to Dial In Espresso: Step-by-Step Guide (2026) | The Coffee Locator
FAQ
How Long Should It Take to Dial In Espresso?
Most beans reach a workable dial-in within three shots, with a fourth shot reserved to confirm the result or make a small temperature or dose refinement.
Should I Change Grind or Dose First When Dialing In?
Change grind first and keep your dose locked at 18g while you find the right extraction window, since grind has the largest effect on flow rate and taste.
Why Does My Espresso Taste Sour?
A sour, sharp shot with a fast extraction time usually means the grind is too coarse or the dose is too low; tighten the grind, or increase yield by 2 to 4g if your time is already in range.
Why Does My Espresso Taste Bitter?
Bitterness paired with a slow shot points to over-extraction from a grind that’s too fine or a yield that ran too long; coarsen the grind, or reduce yield by 2 to 4g if timing already looks correct.
What’s the Standard Espresso Ratio for Dialing In?
The standard starting ratio is 1:2, meaning 18 grams of ground coffee in and 36 grams of espresso out, pulled in roughly 25 to 32 seconds.
Which Coffee Should I Practice Dialing In On?
A consistent, freshly roasted bag makes dialing in easier since the bean itself stays a fixed variable; Eastviewcoffee’s Espresso Blend is roasted specifically with this kind of clear, readable feedback in mind.