
1:5, Dilute 1:1, Cold Brew Ratio by Weight for Home Brewers
Start with a 1:5 coffee-to-water ratio by weight for a concentrate, then dilute it 1:1 before you drink it. Weigh your coffee and water on a kitchen scale, cover the jar, and steep it in the fridge for 12 to 18 hours. That single move fixes most of the sour or bitter batches home brewers blame on their beans.
TL;DR:
- Using a 1:5 coffee-to-water ratio by weight and diluting 1:1 produces a balanced cold brew, but ratios should be adjusted based on bean freshness and roast level.
- Coarse grind size similar to sea salt is essential to prevent fines and sediment, which can cause muddiness and bitterness regardless of the ratio.
- Steep time in the fridge should range from 12 to 16 hours for concentrates and 18 to 24 hours for ready-to-drink options, with longer steeping risking over-extraction.
- Consistent measurement by weight ensures accurate ratio adherence, with scaling based on grams providing precision across different batch sizes.
- Stale beans or incorrect grind size are common causes of poor flavor, not ratio alone, so freshness and grind are critical to brewing success.
Table of Contents
- What Cold Brew Ratio Should You Use?
- How Do You Measure and Scale a Cold Brew Ratio?
- Grind Size and Water: The Variables Ratio Depends On
- How Long Should You Steep Cold Brew Coffee?
- Filtering and Diluting Your Cold Brew
- Fixing a Bad Batch Without Starting Over
- Why Your Beans Change the Math
- Does Bean Origin or Roast Level Change Your Ratio?
- A Home Brewer’s Rule of Thumb for Dialing In Ratio
- Get Your Next Batch Right From the First Jar
- Sources
- FAQ
What Cold Brew Ratio Should You Use?
Cold brew splits into two categories, and mixing them up is the most common reason a batch tastes wrong. Concentrate is brewed strong on purpose because you dilute it later. Ready-to-drink (RTD) cold brew is brewed at drinking strength, so there’s no dilution step.
For concentrate, a 1:4 to 1:8 range covers most preferences, with 1:5 as the standard starting point. A lighter concentrate around 1:8, a style some specialty guides recommend for a cleaner cup, still needs dilution but tastes less muddy if you tend to under-dilute. For RTD, aim for 1:10 to 1:15, no dilution needed.
Here’s what those ratios look like in real kitchen quantities:
- 1:4 concentrate: 200g coffee to 800g water for a 1-liter batch, brewed strong and cut heavily
- 1:5 concentrate: 130g coffee to 650g water for a 32-ounce jar, the most common home starting point
- 1:8 concentrate: 100g coffee to 800g water for a 1-liter batch, lighter and dilutes cleaner
- 1:12 RTD: 300g coffee to 3,600g water for a gallon jug, ready to pour over ice as-is
The National Coffee Association’s quick reference puts standard cold brew at roughly 1 gram coffee to 4 or 5 grams water, which lines up with the concentrate range most recipes converge on. Dilute concentrate with water, milk, or oat milk depending on how you drink it. RTD skips that step entirely, which is why it needs a weaker starting ratio.
How Do You Measure and Scale a Cold Brew Ratio?
Ratios only work if you measure by weight, not volume. A cup of coffee grounds can weigh anywhere from 80 to 100 grams depending on grind size and how packed it is, but a gram of coffee is always a gram. That’s why every serious cold brew recipe, including the household-measure guides that use spoons and cups as a fallback, ultimately points back to a scale for consistency.
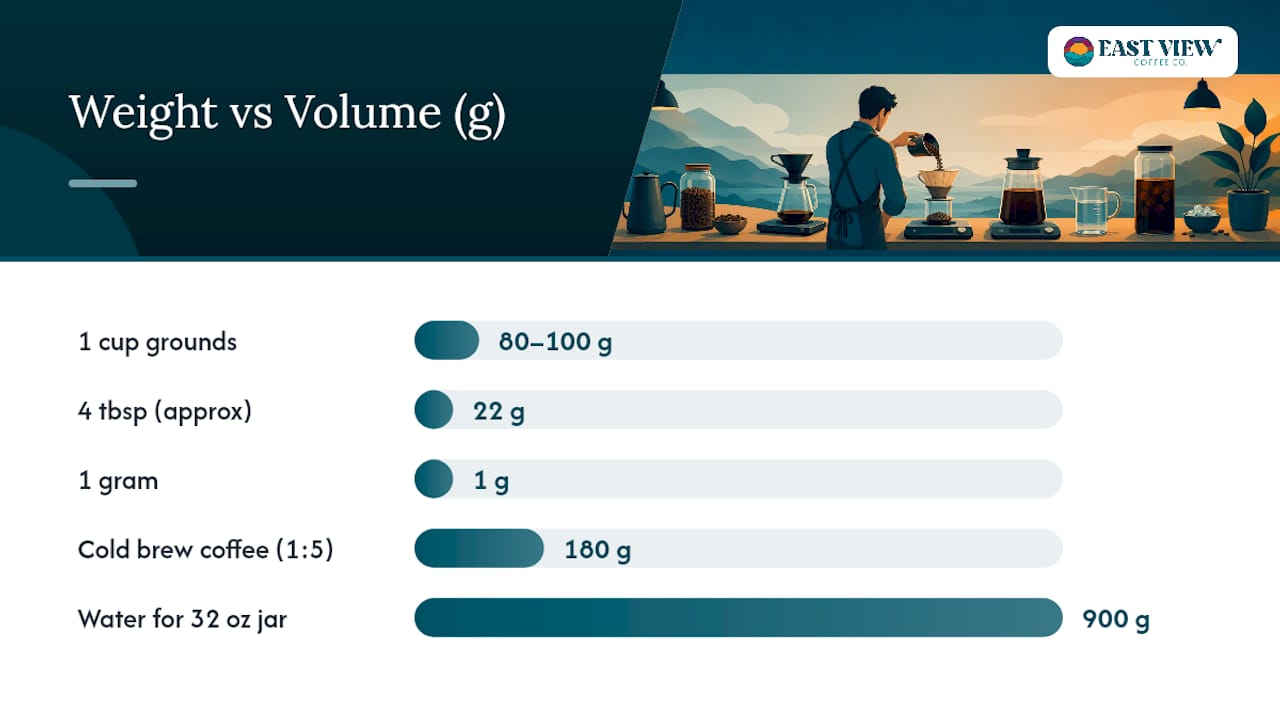
Pro Tip: If you don’t own a scale, 4 tablespoons of coarsely ground coffee weighs approximately 22 grams. Use that as your conversion anchor when scaling a recipe up or down.
Here’s the process for any batch size:
- Tare your scale with the empty jar or container on it.
- Weigh your coffee directly into the jar, resetting to zero if needed.
- Pour water slowly until the total weight hits your target (coffee plus water).
- Stir once, firmly, to make sure every ground is saturated. Skipping this step leaves dry pockets of coffee that never fully extract.
Scaling is simple once you think in grams: a 1:5 ratio for a 32-ounce jar (roughly 900g of water) needs 180g of coffee. Double the water for a half-gallon batch, and you double the coffee too. The math never changes, only the numbers you plug in.
Grind Size and Water: The Variables Ratio Depends On
A coarse grind, close to what you’d use for a French press, is non-negotiable for cold brew. Fine grounds and “fines” (the powdery dust from grinding) slip through most filters and create a muddy, over-extracted bitterness no ratio adjustment can fix.
- Use a grind roughly the texture of coarse sea salt or breadcrumbs.
- Filtered water produces cleaner flavor than tap water with heavy chlorine or mineral content.
- Starting the brew cold (straight from the fridge) versus room temperature changes your steep time, covered in the next section.
- If your batch tastes flat regardless of ratio, suspect your grind before you touch your numbers.
Pro Tip: If your cold brew tastes gritty or leaves sediment at the bottom of the glass, your grind is too fine, not your ratio too strong. Coarsen the grind before you dilute more.
How Long Should You Steep Cold Brew Coffee?
Steep time and ratio work together. A stronger ratio brewed for too long tastes harsh; a weak ratio brewed too briefly tastes like flavored water. Refrigerator steeping is the safer default because cold temperatures slow extraction, giving you a wider margin for error.
- Concentrate, fridge: 12 to 16 hours
- RTD, fridge: 18 to 24 hours
- Room temperature: 8 to 12 hours for either style, but flavor shifts fast once you pass that window
These ranges come from steep-time testing across ratio and temperature combinations, and the pattern holds regardless of bean origin: colder water needs more time to pull the same flavor compounds that hot water extracts in minutes. Time is effectively standing in for heat here, which is why an extra hour or two at room temperature matters far more than an extra hour in the fridge.
Taste your batch at the low end of the range first. You can always steep longer, but you can’t undo an over-extracted, bitter jar. Caffeine content rises with steep time too, so a 16 hour fridge concentrate will hit noticeably harder than a 12 hour one, even at the same ratio.
Filtering and Diluting Your Cold Brew
How you filter changes the final texture as much as the ratio does. A fine mesh strainer alone lets some fines through, producing a heavier, more textured cup. Cheesecloth over a strainer catches most of that sediment. A paper filter (a coffee filter or a dedicated cold brew filter) gives you the clearest, most tea-like result, though it takes longest to drain.
- Classic dilution: 1:1, concentrate to water, for a standard-strength iced coffee
- Milk-based drinks: dilute closer to 1:1 with milk or a milk alternative for a creamier, less sharp cup
- Cocktails or espresso martinis: use concentrate closer to full strength with minimal dilution
- Storage: filtered concentrate keeps in the fridge for 7 to 10 days in a sealed, labeled jar; RTD is best within 5 to 7 days since it’s already diluted
Label your jar with the brew date and ratio. It sounds unnecessary until you’ve got three jars in the fridge and no memory of which one is the 1:5 and which is the 1:8. For serving ideas beyond a straight pour over ice, East View Coffee’s guide to iced coffee three ways covers milk, sweetener, and cocktail-style variations.
Fixing a Bad Batch Without Starting Over
Most cold brew problems trace back to one of three variables, and none of them require dumping the jar.
- Thin or sour: under-extracted. Steep longer next time, or tighten your ratio (more coffee per gram of water).
- Bitter or harsh: over-extracted. Shorten the steep time or coarsen your grind before the next batch.
- Muddy or gritty: filtration problem, not a ratio problem. Add a paper filter or cheesecloth layer.
- Taste your dilution before judging the concentrate. A “bitter” concentrate is often perfectly balanced once diluted properly.
- Keep a simple log: ratio, grind, steep time, and your rating out of 10. Patterns show up after three or four batches.
Small habits matter as much as the numbers. Stir once at the start to saturate every ground, and filter immediately once steep time is up. Letting grounds sit in finished cold brew keeps extracting, quietly pushing a good batch toward bitter.
For a deeper look at where most home setups go wrong beyond ratio, East View Coffee’s common brewing mistakes breakdown covers issues that show up across brewing methods, not just cold brew.
Why Your Beans Change the Math
East View Coffee roasts in small batches in Kenosha, Wisconsin, sourcing exclusively from women-owned farms, which means the beans going into your cold brew were roasted days, not months, before they reach your kitchen. Freshness matters for ratio precision because stale beans lose the oils and soluble compounds a ratio depends on, so an old bag needs more coffee per gram of water to taste the same as a fresh one.
- Try the Cold Brew Blend, roasted specifically with cold extraction in mind and a solid match for the standard 1:5 concentrate ratio.
- For a lighter caffeine profile without losing body, a half-caff option works well at the same ratios covered above.
- The brewing guide covers grind and extraction adjustments that pair with the ratios in this article.
Does Bean Origin or Roast Level Change Your Ratio?
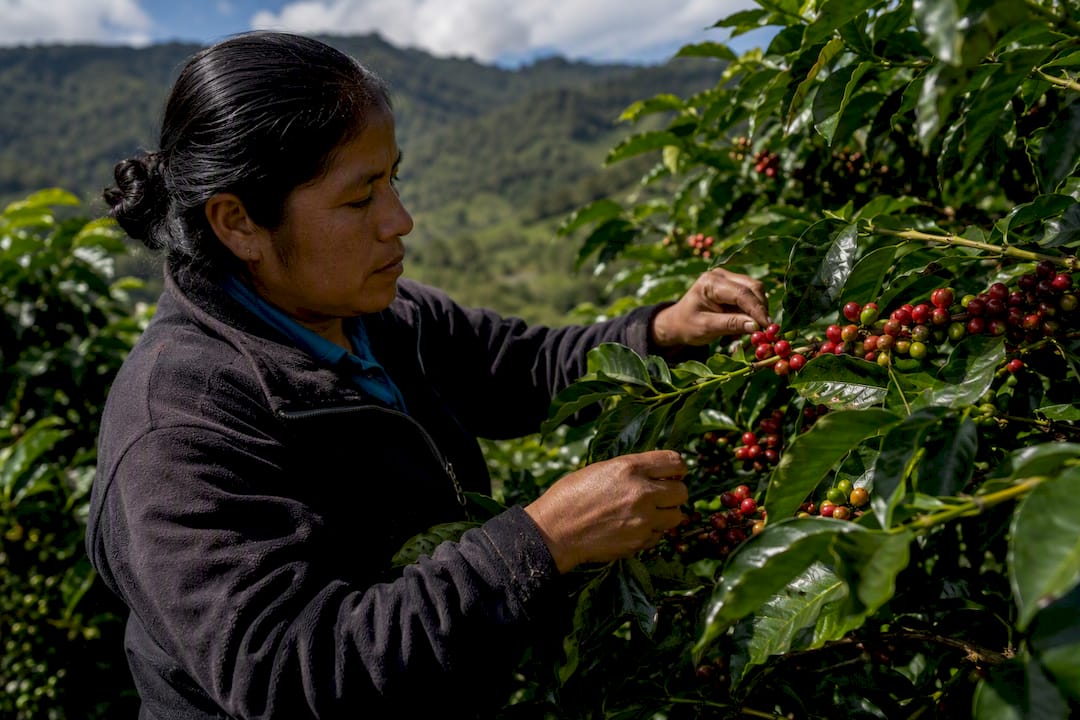
Origin and roast level shift how a ratio tastes even when the numbers stay identical. Beans from higher-altitude regions, common among many women-owned farms East View Coffee partners with, tend to carry brighter acidity and fruit-forward notes that read as sour if under-extracted. Those beans often do better at a slightly tighter ratio, closer to 1:4, so the extra coffee balances the natural brightness.
Darker roasts behave differently. The roasting process breaks down some of the bean’s density and solubility, so dark roast coffee extracts faster and can turn bitter or ashy at the same steep time a medium roast handles fine. If you’re using a dark roast, either shorten your steep time by two or three hours or shift your ratio slightly weaker, toward 1:6, to avoid over-extraction.
Medium roasts sit in the middle and tolerate the standard 1:5 range with the most flexibility, which is part of why most cold brew recipes default to a medium roast as their baseline. If you switch between light, medium, and dark roasts, don’t expect one ratio to serve all three well. Treat roast level as a variable you adjust for, the same way you’d adjust for grind size or steep time.
A Home Brewer’s Rule of Thumb for Dialing In Ratio
Most people over-correct. They taste a batch that’s slightly off and swing the ratio hard in the opposite direction, when a small nudge of 5 to 10 grams of coffee per liter usually does the job. Change one variable at a time, taste after dilution, and write down what you changed.
The habit that helps most: taste your concentrate diluted, not straight. Sipping concentrate at full strength distorts your read on bitterness and makes a perfectly good batch seem harsh when it just needed its intended dilution.
— Jenny
Get Your Next Batch Right From the First Jar
Skip the trial-and-error phase by starting with coffee that’s already suited to cold extraction. East View Coffee’s Cat’s Pajamas Half-Caff is roasted with a balanced, medium profile that holds up well at the standard 1:5 concentrate ratio, and its reduced caffeine content makes it a smart pick for large batches you’ll be sipping on all week.

If you’re not sure which roast fits your taste yet, the Sunny’s Choice Bundle gives you a few different profiles to test side by side, so you can find your ideal ratio faster instead of guessing with a single bag. Once you know what you like, a coffee subscription keeps fresh beans arriving on your schedule, which matters more for ratio consistency than most people realize since stale coffee throws off every measurement you’ve dialed in. Order a bag or set up a subscription on the East View Coffee site and start your next batch this week.
Sources
- Cold Brew Coffee Ratio: The Complete Guide + Chart
- How Long to Steep Cold Brew Coffee
- Cold brew coffee - NCA - About Coffee
- How To Make Cold Brew Coffee - Simply Recipes
FAQ
What Is the Best Ratio for Cold Brew Concentrate?
A 1:5 coffee-to-water ratio by weight is the most common starting point, diluted 1:1 before drinking.
How Much Coffee Do I Need for a Gallon of Cold Brew?
For ready-to-drink, a ratio near 1:12 is typical; proportionally scale your coffee and water to your batch size.
Can I Steep Cold Brew Too Long?
Yes. If steeped too long, such as beyond about a day in the fridge or half a day at room temperature, cold brew can develop bitter and over-extracted flavors.
Does Grind Size Really Affect the Ratio?
Grind size doesn’t change the ratio itself, but a too-fine grind adds fines and sediment that make the same ratio taste muddier and harsher.
What Coffee Works Best for Cold Brew?
A medium roast with a balanced profile, like East View Coffee’s Cold Brew Blend, tolerates the standard 1:5 ratio with the least adjustment.